耶,目前還是主要以Qt3在寫程式,所以,先用Qt3的designer來說明吧~
在開發Qt視窗程式時,我們可以使用Qt Designer的所視即所得環境,協助我們進行視窗外觀的設計,並透過指令產生對應的*.h與*.cpp檔案,這邊介紹Qt Designer的一些簡單的使用方法。
首先開啟Qt Designer,執行選單中的[File/New]指令(或按Ctrl+N)新增要使用的視窗類型,如下圖所示:
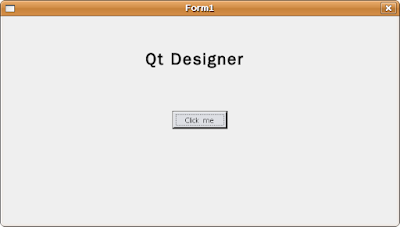
接下來的畫面與Visual Basic很像,我們在左邊的Toolbox選擇元件,在中間的表單區域以拖拉的方式配置元件,在右邊的Property Editor設定相關屬性,假設我們的元件如下配置:
接下來我們進行簡單的Signals - Slots連結,執行選單中的[Tools/Connect Signal/Slots]指令(或按F3),然後選擇發出Signal的元件,接著會出現以下視窗,在這邊我們簡單的設定按下按鈕後關閉視窗:
您可以執行選單中的[Preview/Preview Form]指令(或按Crtl+T)來預覽配置成果,接下來我們執行[File/Save]指令(或按Ctrl+S),將之儲存為form1.ui檔,這個檔案一堆描述元件屬性的標籤所組成,我們可以使用下面的指令來產生*.h檔:$ uic -o form1.h form1.ui
然後我們使用下面的指令產生*.cpp檔:$ uic -i form1.h -o form1.cpp form1.ui
您可以直接開啟這兩個檔案來看看它們的內容,並根據實際需求再作些修改,下面是我們產生的*.h檔內容:
/****************************************************************************
** Form interface generated from reading ui file 'form1.ui'
**
** Created: 二  5月 19 21:37:24 2009
**
** WARNING! All changes made in this file will be lost!
****************************************************************************/

#ifndef FORM1_H
#define FORM1_H

#include <qvariant.h>
#include <qdialog.h>

class QVBoxLayout;
class QHBoxLayout;
class QGridLayout;
class QSpacerItem;
class QLabel;
class QPushButton;

class Form1 : public QDialog
{
    Q_OBJECT

public:
    Form1( QWidget* parent = 0, const char* name = 0, bool modal = FALSE, WFlags fl = 0 );
    ~Form1();

    QLabel* textLabel1;
    QPushButton* pushButton1;

protected:

protected slots:
    virtual void languageChange();

};

#endif // FORM1_H
下面是產生的*.cpp內容:
/****************************************************************************
** Form implementation generated from reading ui file 'form1.ui'
**
** Created: 二  5月 19 21:38:40 2009
**
** WARNING! All changes made in this file will be lost!
****************************************************************************/

#include "form1.h"

#include <qvariant.h>
#include <qlabel.h>
#include <qpushbutton.h>
#include <qlayout.h>
#include <qtooltip.h>
#include <qwhatsthis.h>

/*
 *  Constructs a Form1 as a child of 'parent', with the
 *  name 'name' and widget flags set to 'f'.
 *
 *  The dialog will by default be modeless, unless you set 'modal' to
 *  TRUE to construct a modal dialog.
 */
Form1::Form1( QWidget* parent, const char* name, bool modal, WFlags fl )
    : QDialog( parent, name, modal, fl )
{
    if ( !name )
        setName( "Form1" );

    textLabel1 = new QLabel( this, "textLabel1" );
    textLabel1->setGeometry( QRect( 210, 30, 150, 65 ) );

    pushButton1 = new QPushButton( this, "pushButton1" );
    pushButton1->setGeometry( QRect( 250, 140, 82, 27 ) );
    languageChange();
    resize( QSize(582, 307).expandedTo(minimumSizeHint()) );
    clearWState( WState_Polished );

    // signals and slots connections
    connect( pushButton1, SIGNAL( clicked() ), this, SLOT( close() ) );
}

/*
 *  Destroys the object and frees any allocated resources
 */
Form1::~Form1()
{
    // no need to delete child widgets, Qt does it all for us
}

/*
 *  Sets the strings of the subwidgets using the current
 *  language.
 */
void Form1::languageChange()
{
    setCaption( tr( "Form1" ) );
    textLabel1->setText( tr( "<h1>Qt Designer</h1>" ) );
    pushButton1->setText( tr( "Click me" ) );
}
我們使用下面這個main.cpp程式來測試成果:
#include "form1.h"
#include <qapplication.h>

int main(int argc, char **argv) {
    QApplication app(argc, argv);

    Form1 *fm = new Form1();
    app.setMainWidget(fm);
    fm->show();

    return app.exec();
}
$ qmake-qt3 -project$ qmake-qt3$ make
參考資料:
使用Qt Designer設計視窗

沒有留言:
張貼留言